Introduction: While creating user input form e.g.
registration where user inputs the details like Name, email address, password
and confirm password ,Website URL,comments/messages etc. we have to implement validations on the form so that
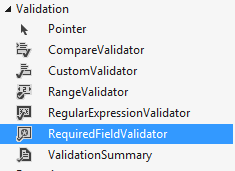
incorrect data could not be submitted to server. Asp.net provides Validation controls like CompareValidator, CustomValidator , RangeValidator, RegularExpressionValidator,
RequiredFieldValidator etc to apply validations on asp.net web page.

<fieldset style="width:770px;">
then change the Display property of the CustomValidator validation controls to None and place a ValidationSummary control from the same validation category from the visual studio toolbox. Set the ShowMessageBox property to true and ShowSummary to false as shown below :
Server Side Validations using CustomValidator

<fieldset style="width:770px;">
In previous article i explained How to use RequiredFieldValidator validation control with example in asp.net and How to use CompareValidator validation control with example in asp.net and How to use RegularExpressionValidator validation control with example in asp.net and How to use RangeValidator validation control with example in asp.net and JavaScript validation in asp.net website and Jquery form validations in asp.net..
Now in this article I will explain how to use CustomValidator control to check the validity of the comments/message length before submitting to server for processing otherwise error message will be displayed to the user.
When to Use?
When no other validation control provided by visual studio fulfills your validation requirement then CustomValidator can do the job. As the name suggest, CustomValidator can be customized as per application requirement. CustomValidation control can be used to validate the controls client side or server side both.
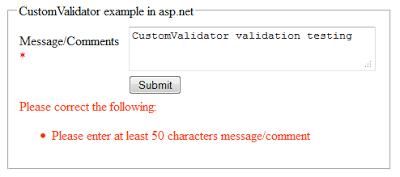
Note: In our example Message/Comments should be at least 50 character long otherwise validation failure message will appear.
In this example I
have demonstrated 3 ways to use CustomValidator control to validate client side and server side.
Client Side Validation using CustomValidator
Case 1: If you want to show the
validation failure message near to text box for which the validation failed as
shown in figure below:
In the <HEAD> of the design page( .aspx ) tag create a
javascript function to validate the Message/comments TextBox length as:
then In the <BODY> tag of the design page(.aspx) Place a TextBox controls for entering Message/comments and a Button control for Submitting . Also place a CustomValidator validation controls from validation category from the visual studio toolbox as shown in below:
<script language="javascript">
function validateMsgLengthClientSide(sender, args) {
if (args.Value.length < 50)
args.IsValid = false;
else
args.IsValid = true;
}
</script>
then In the <BODY> tag of the design page(.aspx) Place a TextBox controls for entering Message/comments and a Button control for Submitting . Also place a CustomValidator validation controls from validation category from the visual studio toolbox as shown in below:

<fieldset style="width:770px;">
<legend>CustomValidator example in asp.net</legend>
<table>
<tr>
<td>Message/Comments <span style="color:red;">*</span></td>
<td>
<asp:TextBox ID="txtMsg" runat="server" TextMode="MultiLine" Rows="2" Columns="35"></asp:TextBox>
</td>
<td>
<asp:CustomValidator ID="csvMsg" runat="server" ErrorMessage="Please
enter at least 50 characters message/comment" ControlToValidate="txtMsg" ForeColor="#FF3300" SetFocusOnError="True" ClientValidationFunction="validateMsgLengthClientSide"
ValidateEmptyText="True"> </asp:CustomValidator></td>
ValidateEmptyText="True"> </asp:CustomValidator></td>
</tr>
<tr>
<td> </td>
<td>
<asp:Button ID="btnSubmit" runat="server" Text="Submit" />
</td>
<td>
</td>
</tr>
</table>
</fieldset>
Case 2: If you want the validation failure
message to show in pop up as shown in figure below:
then change the Display property of the CustomValidator validation controls to None and place a ValidationSummary control from the same validation category from the visual studio toolbox. Set the ShowMessageBox property to true and ShowSummary to false as shown below :
<fieldset style="width:770px;">
<legend>CustomValidator example in asp.net</legend>
<table>
<tr>
<td>Message/Comments <span style="color:red;">*</span></td>
<td>
<asp:TextBox ID="txtMsg" runat="server" TextMode="MultiLine" Rows="2" Columns="35"></asp:TextBox>
</td>
<td>
<asp:CustomValidator ID="csvMsg" runat="server" ErrorMessage="Please
enter at least 50 characters message/comment" ControlToValidate="txtMsg" ForeColor="#FF3300" SetFocusOnError="True" ClientValidationFunction="validateMsgLengthClientSide" Display="Dynamic"
ValidateEmptyText="True"></asp:CustomValidator></td>
ValidateEmptyText="True"></asp:CustomValidator></td>
</tr>
<tr>
<td> </td>
<td>
<asp:Button ID="btnSubmit" runat="server" Text="Submit" />
</td>
<td>
</td>
</tr>
<tr>
<td colspan="3">
<asp:ValidationSummary ID="ValidationSummary1" runat="server" ForeColor="#FF3300" HeaderText="Please
correct the following: " ShowMessageBox="True" ShowSummary="False" />
</td>
</tr>
</table>
</fieldset>
Case 3: If you want to show validation failure
message in a separate place as shown in figure below :
then Set the ShowMessageBox property
to false and ShowSummary property to true as shown below.
<asp:ValidationSummary ID="ValidationSummary1" runat="server" ForeColor="#FF3300" HeaderText="Please
correct the following: " ShowMessageBox="False" ShowSummary="True" />
Case 1: If you want to show the
validation failure message near to text box for which the validation failed as
shown in figure below:


then
In the <BODY> tag of the design
page(.aspx) Place a TextBox controls for entering Message/comments and a Button control for Submitting . Also place a
CustomValidator validation
controls from validation category from the visual studio toolbox as
shown in below:

<fieldset style="width:770px;">
<legend>CustomValidator example in asp.net</legend>
<table>
<tr>
<td>Message/Comments <span style="color:red;">*</span></td>
<td>
<asp:TextBox ID="txtMsg" runat="server" TextMode="MultiLine" Rows="2" Columns="35"></asp:TextBox>
</td>
<td>
<asp:CustomValidator ID="csvMsg" runat="server" ErrorMessage="Please enter at least 50 character
message/comment" ControlToValidate="txtMsg" ForeColor="#FF3300" SetFocusOnError="True" OnServerValidate="validateMsgLengthServerSide" ValidateEmptyText="True"></asp:CustomValidator>
</td>
</tr>
<tr>
<td> </td>
<td>
<asp:Button ID="btnSubmit" runat="server" Text="Submit" />
</td>
<td>
</td>
</tr>
</table>
</fieldset>
Case 2: If you want to show validation failure
message in a separate place as shown in figure below :
then Set the ValidationsSummary 's ShowMessageBox property
to false and ShowSummary property to true and CustomValidator's Display property to None as shown below
<fieldset style="width:500px;">
<legend>CustomValidator example in asp.net</legend>
<table>
<tr>
<td>Message/Comments <span style="color:red;">*</span></td>
<td>
<asp:TextBox ID="txtMsg" runat="server" TextMode="MultiLine" Rows="2" Columns="35"></asp:TextBox>
</td>
<td>
<asp:CustomValidator ID="csvMsg" runat="server" ErrorMessage="Please
enter at least 50 character message/comment" ControlToValidate="txtMsg" ForeColor="#FF3300" SetFocusOnError="True" OnServerValidate="validateMsgLengthServerSide" ValidateEmptyText="True" Display="None"></asp:CustomValidator></td>
</tr>
<tr>
<td> </td>
<td>
<asp:Button ID="btnSubmit" runat="server" Text="Submit" OnClick="btnSubmit_Click" />
</td>
<td>
</td>
</tr>
<tr>
<td colspan="3">
<asp:ValidationSummary ID="ValidationSummary1" runat="server" ForeColor="#FF3300" HeaderText="Please
correct the following:" ShowMessageBox="false" ShowSummary="true"/>
</td>
</tr>
</table>
</fieldset>
Now over to you:
"If you like my work; you can appreciate by leaving your comments, hitting Facebook like button, following on Google+, Twitter, Linked in and Pinterest, stumbling my posts on stumble upon and subscribing for receiving free updates directly to your inbox . Stay tuned and stay connected for more technical updates."


8 comments
Click here for commentsvery informative site :)
ReplyThanks for your appreciation..stay tuned and stay connected..
Replynice and easy to understand.....
Replykeep reading for more useful updates :)
Replythanx
ReplyYour welcome..stay connected and keep reading :)
Replyvery--- very helpful.....
ReplyBig.... Big.... Thanks.....
Thanks Lalit Singh..it is always nice to hear that my article helped anyone..Stay connected and keep reading for more useful updates like this one..:)
ReplyIf you have any question about any post, Feel free to ask.You can simply drop a comment below post or contact via Contact Us form. Your feedback and suggestions will be highly appreciated. Also try to leave comments from your account not from the anonymous account so that i can respond to you easily..