Introduction: In this article I will explain the
following with example:
Reason and Solution: In previous gridview related articles i explained with example How to Bind,Save,Edit,Update,Cancel,Delete,Paging example in GridView in asp.net C# and Bind and Export GridView data to PDF file in asp.net and How to upload, download and delete files from GridView and How to bind gridview and highlight gridview row on mouse over.
The above error usually occurs if you missed to initialize the SelectCommand property.
- How to solve the error “The SelectCommand property has not been initialized before calling 'Fill'.”
- How to bind / load/ fill gridview with sql server database in asp.net using both C# and VB.Net language.
Reason and Solution: In previous gridview related articles i explained with example How to Bind,Save,Edit,Update,Cancel,Delete,Paging example in GridView in asp.net C# and Bind and Export GridView data to PDF file in asp.net and How to upload, download and delete files from GridView and How to bind gridview and highlight gridview row on mouse over.
The above error usually occurs if you missed to initialize the SelectCommand property.
SqlDataAdapter adp = new SqlDataAdapter();
adp.SelectCommand = cmd
or
SqlDataAdapter adp = new SqlDataAdapter(cmd);
Note: Read the full article for
the complete working code to bind the gridview without any error.
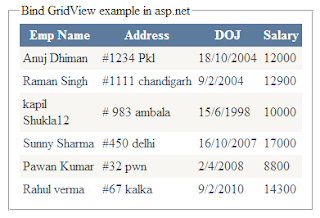
Implementation: Let's create an application to bind gridview from sql server database.
- First Create the database in sql server e.g. Emp_DB and in this create a table with the following structure and give name Emp_Tb
Column Name
|
Data Type
|
Emp_Id_Pk
|
Int(primary
key so set Is Identity= Yes
|
EmpName
|
varchar(100)
|
Address
|
varchar(500)
|
DOJ
|
varchar(50)
|
Salary
|
int
|
- In the web.config file create the connection string to connect our application with sql server database.
<connectionStrings>
<add name="conStr" connectionString="Data Source=LocalServer;Initial Catalog=Emp_DB;Integrated
Security=True"/>
</connectionStrings>
HTML Source:
- Place a GridView control from the Data category of the visual studio’s toolbox.
<fieldset style="width:345px;">
<legend>Bind GridView example in asp.net</legend>
<asp:GridView ID="grdEmp" runat="server"
AutoGenerateColumns="False"
CellPadding="4"
ForeColor="#333333"
GridLines="None">
<EditRowStyle
BackColor="#999999"
/>
<FooterStyle
BackColor="#5D7B9D"
Font-Bold="True"
ForeColor="White"
/>
<HeaderStyle CssClass="fixedHeader"
BackColor="#5D7B9D"
Font-Bold="True"
ForeColor="White"
/>
<AlternatingRowStyle
BackColor="White"
ForeColor="#284775"
/>
<Columns>
<asp:TemplateField HeaderText="Emp
Name">
<ItemTemplate>
<asp:Label ID="lblEmpName" runat="server" Text='<%#
Bind("EmpName") %>'></asp:Label>
</ItemTemplate>
</asp:TemplateField>
<asp:TemplateField HeaderText="Address">
<ItemTemplate>
<asp:Label ID="lblAddress" runat="server" Text='<%#
Bind("Address") %>'></asp:Label>
</ItemTemplate>
</asp:TemplateField>
<asp:TemplateField HeaderText="DOJ">
<ItemTemplate>
<asp:Label ID="lblDOJ" runat="server" Text='<%#
Bind("DOJ") %>'></asp:Label>
</ItemTemplate>
</asp:TemplateField>
<asp:TemplateField HeaderText="Salary">
<ItemTemplate>
<asp:Label ID="lblSalary" runat="server" Text='<%#
Bind("Salary") %>'></asp:Label>
</ItemTemplate>
</asp:TemplateField>
</Columns>
<PagerStyle
BackColor="#284775"
ForeColor="White"
HorizontalAlign="Center"
/>
<RowStyle
BackColor="#F7F6F3"
ForeColor="#333333"
/>
<SelectedRowStyle
BackColor="#E2DED6"
Font-Bold="True"
ForeColor="#333333"
/>
<SortedAscendingCellStyle
BackColor="#E9E7E2"
/>
<SortedAscendingHeaderStyle
BackColor="#506C8C"
/>
<SortedDescendingCellStyle
BackColor="#FFFDF8"
/>
<SortedDescendingHeaderStyle
BackColor="#6F8DAE"
/>
</asp:GridView>
</fieldset>
C#.Net Code
- In the code behind file(.aspx.cs) write the code as:
First include the following
namespaces
using System.Data;
using System.Data.SqlClient;
using System.Configuration;
Then write the code to bind the
gridview on page load event:
SqlConnection con = new
SqlConnection(ConfigurationManager.ConnectionStrings["conStr"].ConnectionString);
protected void
Page_Load(object sender, EventArgs e)
{
if (!Page.IsPostBack)
{
BindEmpGrid();
}
}
private void
BindEmpGrid()
{
DataSet ds = new DataSet();
SqlDataAdapter adp = new
SqlDataAdapter();
try
{
SqlCommand cmd = new SqlCommand("select *
from Emp_Tb", con);
adp.SelectCommand = cmd;
adp.Fill(ds);
if (ds.Tables[0].Rows.Count > 0)
{
grdEmp.DataSource = ds;
grdEmp.DataBind();
}
}
catch (Exception
ex)
{
ScriptManager.RegisterStartupScript(this, this.GetType(),
"Message", "alert('Error occured : " + ex.Message.ToString() + "');", true);
}
finally
{
ds.Clear();
ds.Dispose();
adp.Dispose();
}
}
VB.Net Code
- In the code behind file(.aspx.vb) write the code as:
First import the following
namespaces
Imports System.Data
Imports System.Data.SqlClient
Imports System.Configuration
Then write the code to bind the
gridview on page load event:
Dim con As New SqlConnection(ConfigurationManager.ConnectionStrings("conStr").ConnectionString)
Protected Sub
Page_Load(sender As Object,
e As System.EventArgs)
Handles Me.Load
If Not
Page.IsPostBack Then
BindEmpGrid()
End If
End Sub
Private Sub
BindEmpGrid()
Dim ds As New DataSet()
Dim adp As New SqlDataAdapter()
Try
Dim cmd As
New SqlCommand("select *
from Emp_Tb", con)
adp.SelectCommand = cmd
adp.Fill(ds)
If ds.Tables(0).Rows.Count > 0 Then
grdEmp.DataSource = ds
grdEmp.DataBind()
End If
Catch ex As Exception
ScriptManager.RegisterStartupScript(Me, Me.[GetType](), "Message", "alert('Error
occured : " & ex.Message.ToString() & "');", True)
Finally
ds.Clear()
ds.Dispose()
adp.Dispose()
End Try
End Sub
Now over to you:
"If you like my work; you can appreciate by leaving your comments,
hitting Facebook like button, following on Google+, Twitter, Linked in and
Pinterest, stumbling my posts on stumble upon and subscribing for receiving
free updates directly to your inbox . Stay tuned for more technical
updates."


If you have any question about any post, Feel free to ask.You can simply drop a comment below post or contact via Contact Us form. Your feedback and suggestions will be highly appreciated. Also try to leave comments from your account not from the anonymous account so that i can respond to you easily..